Saturn S-series Manual Clutch Replacement
Disclaimer:
I am not a mechanic. These instructions are a conglomeration of several other how-to documents, Saturn FSMs, shop manuals, online postings and other sources of information. These instructions should not be considered a stand alone document and should be used in conjuction with an FSM, Haynes, or Chiltons manual. These instructions are in no way authorized, approved, or otherwise condoned by Saturn Corp. If you render your car undrivable, unsafe, or just plain broken I am in no way responsible. If you are an idiot, moron or just plain stupid do not attempt this repair.
Introduction:
It took me 14 hours over two days to complete this repair. This is not the easiest method for replacing a clutch but it does allow you to do it with the engine in the car and without a needing an alignment afterwards. Previous to this the most complicated things I had done were brake pads and rotors, valve cover gasket, and a radiator. On a scale of one to ten with an oil change being a one, pads and rotors being a three I would rate this a seven. If you have access to a lift use it, otherwise plan on spending a large amount of time lying down on your back under the car. Also you will need to be able to lift approximately 80 pounds from this position as you maneuver the transmission into the driver’s side wheel well. This procedure will be slightly easier if you do not have AC installed. Most of the photos are from a 2001 SC2, your vehicle may be slightly different. I have purposely not included any torque specifications in this document, this will hopefully force you to buy a Haynes or Chiltons manual.
Tools and parts needed:
- Usual hand tools (Including 18mm open wrench)
- Jack
- Jack Stands
- New shifter tower gasket or RTV
- 2.5L Dextron III trans fluid
- Clutch / pressure plate / throwout bearing
- Clutch alignment tool
- 2 Ball joint cotter pins
- Torque wrench
- Large Pry Bar
- 30mm Tall Socket
- Some sort of engine support
- Saturn shop manual with torque specifications
Much easier if you have a hoist to run the car up and down. Assuming that you don't so try and get the car as high into the air as you can, SAFELY OF COURSE. 15-18 inches between the rear subframe and the floor is probably a good compromise. Since you will be exerting some force on various components while the car is elevated, it’s critical that the supports are absolutely solid.
The engine will need to be supported, either by an engine support from the top or something from below that will not be in the way or get knocked over and drop the engine on you. From the top is likely the best. If you support it from the bottom, a wood block under the oilpan works.
As you remove hardware, lay it down on a clean surface in a line in the sequence it was removed. This will help prevent missing something during reassembly.
On the top (car can be on the floor or slightly elevated):
1. Make note of your car stereo preset stations. This may sound stupid but the next step is to disconnect the battery so unless your radio has a battery backup you will end loosing all of your preset stations. If you have an aftermarket stereo like I do that’s 30 presets you’ll have to remember.
2. Remove strut tower brace if installed. Be sure to replace the strut tower mounting nuts. This step may not be 100% necessary but you will be thankful for the extra room later.
3. Remove the air intake/air filter box, battery, and battery tray. On newer S Series you will need to disconnect the PCM (square silver box behind the battery). If you have never removed the battery tray there is one bolt that is accessed from the drivers side wheel well. Don’t do what I did and just rip it out. If you do, a little super glue and JB Weld will make it right.
4. Disconnect the reverse switch connector from the top of the shifter tower, the speed sensor connector from the transmission and the coolant temperature sensor connector from the engine.
5. Disconnect the shifter cables from the shifter tower and remove them from the transmission bell housing. The cables are attached to the shifter tower by small clips that should just slide off. To disconnect them from the bell housing just pull back slightly and then lift through the slot. (There is an excellent diagram in the Saturn FSM if you have one.)
6. Disconnect the spark plug wires. Disconnect the cable from the ignition coils. Remove the ignition coils from the engine.
7. Remove the clutch slave cylinder. Do NOT disconnect the hydraulic lines. The Saturn clutch hydraulics are a closed system and are not meant to be serviced. If you accidentally pull one of these lines you will need to buy new hydraulics from Saturn. Do NOT step on the clutch with the slave cylinder removed. Doing so will destroy the part and you will need to replace the entire hydraulic system. Removing the slave cylinder is sort of like opening a medicine bottle. Push in and twist one-third turn and it should just pop out. Remove the two nuts that secure the cylinder bracket and move it up out of the way.
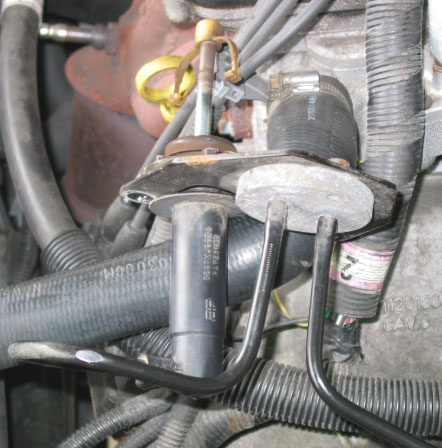
8. On the top of the transmission is the upper locator bracket/mount. It connects the transmission to one of the two 'dogbone' style motor mounts. Remove the two bolts that secure the bracket to the transmissions and lift it up out of the way.
9. Some people have said that you should also remove the shifter tower. Others have said that it is not necessary. If you don’t remove it you won’t need a new gasket but you also might not have enough clearance to move the transmission into the wheel well. Your choice. I removed it and didn’t have a problem. If you do remove it be sure to clean the area first and then cover the opening with a rag or something to keep dirt from falling in.
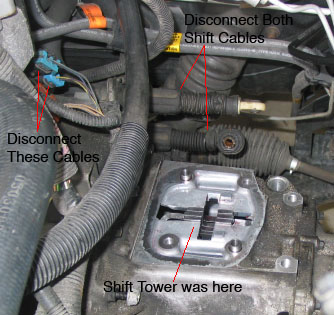
10. There are two bolts that secure the bell housing to the engine. You may notice ground cables connected to them. Disconnect the ground cables and remove the two bolts.
11. By now you probably have a mess of cables all over the place. It would probably be a good idea to lift them up out of the way as much as possible. String or zip ties work well.
12. If your going to install an engine support from above do so now. This should be everything that needs to be done from the top of the car.
13. Jack up the car and use jack stands. A good 15 to 18 inches should suffice. Make sure the car is secure. You will need to exert a lot of force on the car from underneath. Don’t be the one idiot every year who kills themselves by a dropping a car on their heads.
14. Remove the left and right front wheel.
15. Drain the transmission fluid. Install the drain plug and tighten it NOW not later, you’ll forget later.
16. If your going to support the engine from below do so now. Again make sure your supports are sturdy and can handle you tightening bolts from underneath.
17. With the 30mm long socket remove the drivers side axle nut. If you try to use a short socket you will round off the nut. The only place I found that had this socket was a specialty autoparts store for $20. Sears, Autozone, and Advance Auto did not carry this. You may find that you need some penetrating oil to loosen up the rust. If you have had work done on the car by a professional mechanic they probably put this on with a air tools. (My right side was much tighter than the left side) Use a long breaker bar to get the leverage needed. Wedge a pry bar between the wheel lugs and the floor to stop the wheel from moving. There is an excellent picture in your Haynes manual that shows this.
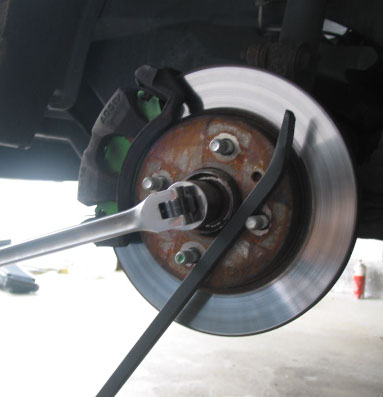
18. Remove the ball joint cotter pin and throw it away. Loosen the castle nut as much as you can, you will need the 18mm box wrench. A cresent wrench won’t fit. It is unlikely the nut will come off all the way as the axle will be in the way.
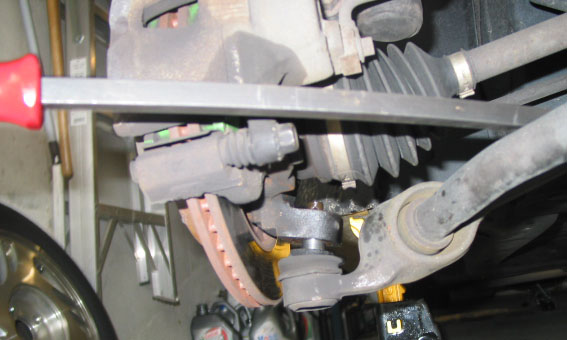
19. Wedge a large pry bar (the larger the better) between the vehicle frame and the front sway bar and pull down, hard. At the same time smack the ball joint with a hammer. Eventually the ball joint will pop out of the knuckle. When it does remove the castle nut and separate the ball joint from the knuckle. DO NOT use a pickle fork or ball joint separator, as you will damage the rubber seal. If you tear the seal you will need to replace the whole piece.
20. Remove the plastic mud shields from inside the wheel well.
21. Twist the knuckle, with the brakes attached, out of the way so that you can pull the axle free. You may need to gently TAP the end of the axle (don’t damage the threads) or use some penetrating oil. To get the axle separated will take a bit of twisting and turning.
22. Use a pry bar on the left side axle at the point where it enters the transmission. Take care not to damage the seals. Pry between the case and the inner constant velocity joint. Pull the axle out the transmission and remove from the car. Again refer to your manual for some excellent photos.
23. The passenger side is similar except that there are three bolts that hold the intermediate shaft bracket to the engine along with one bolt that holds the intake manifold support. Remove these four bolts and you should be able to remove the intermediate shaft along with the axle. Some people say that you need to separate the axle and intermediate shafts but I did not find this necessary. Others say that the shaft and axle will not separate from the transmission at this point but I didn’t have problem getting them out. (Some people have mentioned that removing the passenger side axle is not necessary at all but I don’t see how.)
[From Wolfman via Saturnfans.com] "My methodology for clutch replacement differs from Ssicarmans in that I also pull the right axle and intermediate shaft, so that when it comes time to remate the transaxle and engine, the only thing I need to align and get meshed up is the input shaft to clutch disk splines. Once that is done (usually by simply slightly twisting the entire transaxle forward and back while gently but firmly pushing it toward the engine) it will sit right there tight against the engine and let you put the bolts in. Reinstalling the intermediate shaft into the bolted up transaxle takes all of about 5 extra minutes, add another 10 and you'll have the right axle back on as well..."
24. Remove the transmission to frame mount. This mount is a rubber block located on the far end of the transmission housing on the drivers side. There are two bolts that hold the mount to the transmission and one nut accessed from underneath that secures the mount to the frame.
25. At the area where the engine bolts to transmission, remove the two bolts holding the support bracket to the transmission. Remove the three bolts holding the tin shield inspection cover to the transmission.
26. Remove the two lower engine to transmission bolts. These two can be hard to locate, there is one near the front and one near the back of the engine and they face different directions. They are large (15mm?) and long.
27. Now the only thing holding the trans in should be gravity and two locating dowels. What has to be done now is to remove the transmission from the engine and coerce it into the opening between the lower engine cradle frame and the car frame inside the driver’s side wheel well. This takes turning and tweaking the transmission from below (usually the best way). Once the trans is in the opening it will rest there very nicely (if you have it jammed in well enough) giving you just enough room to get to the clutch and remove that.
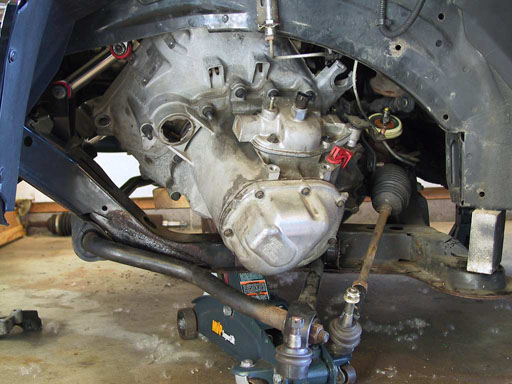
Note: In this photo the shift tower is still attached. Also note that the strut and brake assembly have been removed.
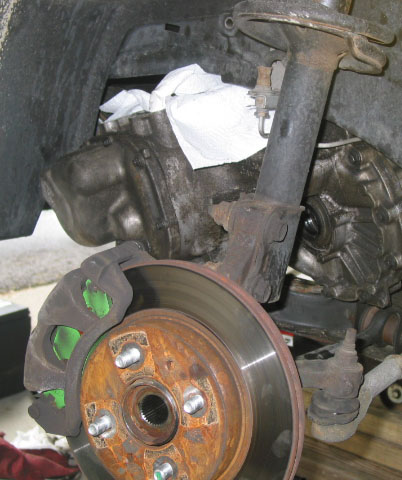
This is the same step but with the strut and brake hardware still attached.
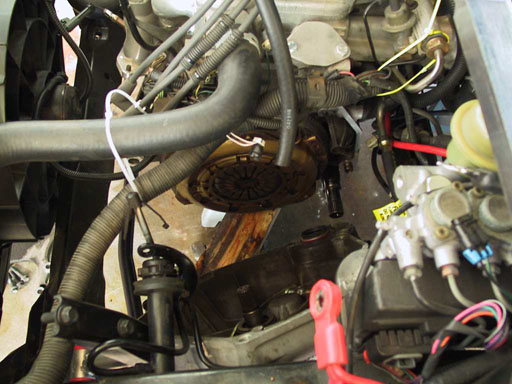
28. The clutch is secured by six small bolts around the outer edge. Remove those and the clutch and clutch plate should just fall out.
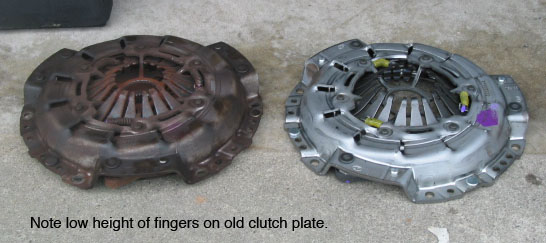
29. Be sure to replace the throw out bearing which is located inside the bell housing.
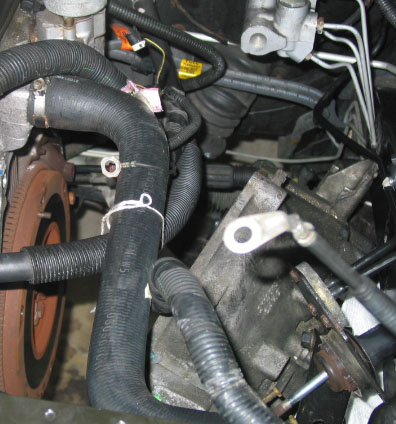
Mine is not as pretty as Lane's but it works.
30. Place your clutch alignment tool into the friction disc and place the disc with tool inserted next to the flywheel. Insert the alignment tool into the engine where the input shaft goes. Be sure to get the correct side of the friction disc next to the flywheel. It should be labeled. (Several people have talked about alternative methods than using a specific alignment tool. These methods might just work fine but they all sounded pretty hokey to me. Do yourself a favor, spend the $10 and buy the tool.)
31. Place the pressure plate over the friction disc with the alignment tool in place. Line up the pressure plate with the pins on the flywheel and secure it with the bolts. Tighten the bolts in an alternating pattern until you reach the specified torque.
32. Remove the alignment tool.
33. Being careful not to drop it on your head move the transmission back into place. Make sure that the transmision housing and engine block are flush together before you start tightening bolts. If the two will not sit flush then something isn't lined up properly. If you have removed both axels (See step 23) this shouldn't require more than a little jiggiling.
34. Attach the two bolts holding the support bracket to the transmission. Attach the three bolts holding the tin shield inspection cover to the transmission. Attach the two lower engines to transmission bolts. Reinstall the transmission to frame mount.
35. Attach the speed sensor cable to the rear of the transmission housing. (I mention this as a separate step because I forgot to do it.)
36. Reinstall the left and right axles into the transmission. Be careful not to damage the seals. Reattach the mounting bracket for the intermediate shaft. Reattach the bracket to the intake manifold.
37. Reinsert the axle ends into the wheel hubs.
38. Using the pry bar pull down on the control arm and slip the ball joint back onto the knuckle, I found the best way to do this was to lay down on the ground pulling down on the pry bar with one hand and maneuvering the knuckle into position with the other. This is the point when you’ll be happy that you spent an extra five bucks on the longer pry bar.
39. Secure the castle nuts. Insert new cotter pins.
40. Reinstall the plastic splash guards.
41. Put the wheels back on, lower the car back to the ground and torque the lug nuts. Do it NOW, you will forget later.
42. Attach the right side upper engine to transmission mount.
43. Refill the transmission fluid. It will be easy to do now and you won’t forget later.
44. Reattach the engine to transmission bolts. If you removed the shift tower reinstall it now. Reattach the shifter cables. Attach the reverse switch connector to the top of the shifter tower and the coolant temperature sensor connector to the engine.
45. Reattach the clutch slave cylinder. It will be harder to install than it was to remove. Just line up the slots with the notches, push real hard and turn. Secure the nuts that hold the clutch slave bracket.
46. Reinstall the ignition coil, ignition coil cable, and spark plug wires.
47. Reinstall the battery tray, battery and PCM (If removed)
48. Install the factory air box or intake.
That should be it. Make one last look for any left over parts, disconnected wires you missed or anything else that might be wrong.
Get in the car and start her up! Pump the brake pedal until it regains pressure. Go for a test drive. Take it easy for the first 500 miles or so to allow the friction disk has time to bed against the flywheel.
Congratulations! You have changed your clutch!
Many thanks to Jeff Putnam, Bill Kuhns, Lane, Kevin Keller, John Comskey, Wolfman, Ssicarman, SaturnSpeed, SPS, SaturnFans.com, SPOCNE, and everyone else.
If you find a problem with these instructions or a better way of doing things, or something I’ve missed please let me know.
Printer freindly version. (Without Pictures or formating)
Updated versions of this document can be found at http://www.cristhomas.com/cars/Clutch/ClutchHowTo.html
Permision is hereby granted to republish and distribute this document provide that no changes are made. This includes but is not limited to the introduction, disclaimer and URLs.
Written By: Cris Thomas (cthomas AT spocne DOT org)
Last Updated: July 12, 2004